Sunday, March 30, 2014

Such Stencil

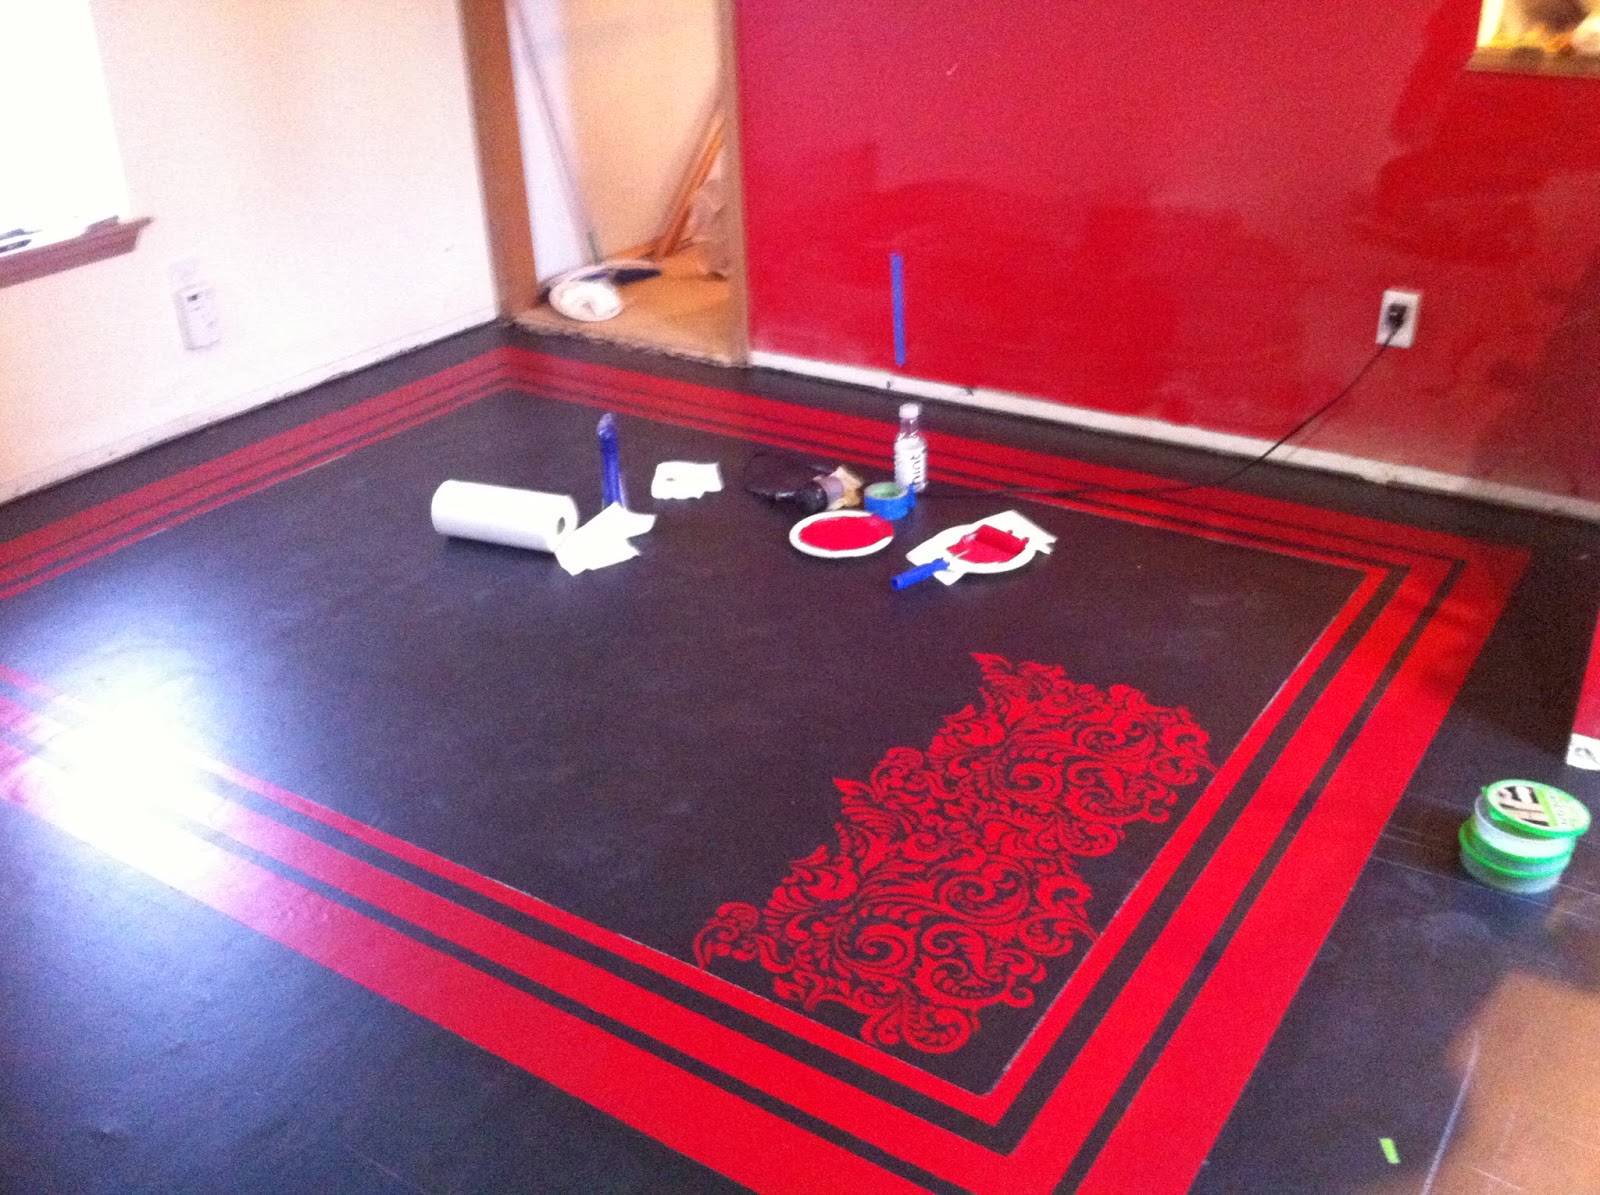
I spent the week filling in the stencil. Once I finished the full stencils, I had to go back and fill in the edges to give it that carpetty look. It took about 9 hours of stenciling to finish the whole thing, plus another few hours to touch up areas where the paint flaked or bled. 
 

Since I have extra of the fancy gold paint I used on the stairs, and I want to use it for trim in this room, I decided to paint random parts of the design with gold. Next step is to wash and seal it. hoping to have it fully finished this week so I can start on the living room side.


Tuesday, March 25, 2014

Le rouge et le noir

"Studying is boring! Let's go paint!" says a certain young black cat.
 

I started the stenciling, unsure about how long it would take. This stencil is almost 2 feet by 2 feet, but there's still a lot of area to cover.

 
It takes about five coats of paint to reach the desired level of opacity.  This is a pain in the rump, as it has to dry between coats and the stencil can't be moved. Each iteration of the stencil takes about 20-30 minutes to complete.

 
Here's the first one completed and closeup. The blank spaces around the edges will be filled in later, so the pattern will go all the way to the edges.

 
The pattern interlocks so it looks like one continuous piece instead of being tile-y. I'm guessing I'm going to need about 3.5 across and 5 lengthwise, so I've many hours of stenciling ahead this week.

 
And voila, one completed row! Time elapsed: 1 hour, 19 minutes. Now back to studying.


Border Patrol

The paint has been drying for three days, so its time for the tape of frogs. I got it laid down and the first coat of red on for the border stripes. 
 
 
After I painted the first two stripes, I decided to add a third, which will effectively decrease the amount of stenciling I have to do. The bedroom was a slow process because of the dark colors and the non-transparent stencil, so anything I can do to help here is worth it. Plus stripes are awesome.

 
I'm not wild about the way the paint is drying, its turning out really... sheer. I'm sure there's an official word for it that has more to do with housepaint than lipstick, but that's what it is. The black is showing through so much that it doesn't look like there is red on it at all. Hopefully a second coat fixes things, otherwise the stenciling is not going to go well (or quickly) at all.
 

The second coat is still showing the black through the red, so I added a third and used a roller to help even out the brush marks. 

 
The frog tape seems to leave sharper lines if I take it off when the paint is not completely dry, so off it comes, stripe by stripe. You can make a flip book of it if you want to see it in action, but don't blame me if it makes you sleepy.


Again I'm really impressed with the frog tape, it lets through almost no paint and comes up super easy. The corners are sharp enough that they are giving a crazy 3D effect right now, which is fancy because I always wanted my floor to be multi-dimensional.


Monday, March 24, 2014

White Lines

The floor got its third and final coat of black today. This is the coat with the gritty crap in it, which definitely helps the light hit differently and hides some of the spots I was worried about.

 
After the paint had dried for a few hours, I decided to work on the borders. I am thinking of making two large areas that look kinda like faux area rugs. Which may look weird when I put actual area rugs on them, but so be it. I'm hoping it will help define the two areas of the room. Laying it out involves a bunch of measuring and straight edging with the level. I use the sides and width of the level to do the spacing and save myself some extra measuring. I got the main big square laid out, but that's when things got weird.

 
Theres a little area coming up from the stairs, before the fireplace that wont take the same borders. I tried to map it out, but its about 3am at this point and I haven't slept in a long time, so it went to hell quickly. Despite the many, many lines, I've decided to leave this area alone for the time being and worry about it later. I'm going to stick with just a large rectangle in the dining area to contain the pattern stencil.


Saturday, March 22, 2014

Gilding

 
In light of the tragic events of my flame stencil, I decided to go with something a bit more understated for the stairs. I have a big poster of paris hanging at the top of the stairs, so I decided to go with a frenchy theme and add some gold fleur de lis.
 
 
I'm also painting the side boards and railings with the same gold. It's Martha Stewart's Tiger's Eye, and I can't find a good link to show it.  It turns out, this isn't a huge change, but it does at some shimmer. And shimmer is my second favourite colour after sparkly.

 
I picked this one, because it was the fanciest in the pack, but now that I see the pictures, it reminds me of a bantha skull or those robots from He-Man that look like a model of the female reproductive system (which I am not linking, find your old health books and look it up yourself).
 
 
Go ahead, tell me those robot claws have never held ovaries!


Back in Black

 
When last we saw the stairs, they looked super-terrifying. Allow me to remind you:
 
 
Today, however, the flames of hell have been extinguished, and the bottom stair is once again full of ebony goodness.

 
While I was at it, I decided to start the dining room floor too.


The first coat has gone on, and it is looking super spotty, which is making me a sad panda. Judging by the amount of dust in the house, I was pretty sure I had sanded down every tiny gap and spot, but a lot of them are showing through the paint. The paint is thinner than the Valspar stuff I used in the clown room, I'm not sure if that's just the difference in brand between them and Behr, or if it has to do with the amount of tint required to get it this dark thinning the paint out. Hoping future coats cover some of it up. 


Monday, March 10, 2014

What not to stair

Every stair now has its final coat of gritty gunk on it, time to start the stenciling! I decided to go with a theme my friend James suggested. I had a chair in my old apartment that had flames running up the legs and clouds on the top, and was the seat between heaven and hell. Seemed like a fun, interesting idea for something different on the stairs. I got some stencils free-with-purchase that are meant for airbrushing makeup, so I decided to use those, since the flame stencil I used in the bedroom is huge.
 
It turns out they're a little smaller than I thought. 

 
I decided to start with a coat of blue, because I want a kinda layery-depth effect, so I used some I had left from the bedroom. 


 The stencil is so small, it takes forever to do the base of the stair. I decided to let it dry for a while then come back and layer in some other colours. Here's a closeup of how it looks, which is suspiciously similar to the bedroom floor.

 
I came back a few hours later to add in some orange and yellow. In retrospect, this is where things went south. You can see I was spacing out the stencil so that I wouldnt smudge wet paint. This was a terrible idea, it created lines and corners that just look awful. 

 
"Ok maybe i can fill some of them in with overlaps and red paint."

 
"this isnt working! more paint!"


"Maybe just stenciling in red over the top will bring it together."


"...maybe from far away...?"

 
Yeah, no. I just wound up with a hot mess of hot-rod flame puke all over the bottom stair. Fortunately its black, so I can just paint over it with more black without it being too big of a loss. I'll look at it tomorrow when its dried and decide for sure, but at this point I think I will just stick with the ombre effect. Turns out, different is not what I'm looking for. 


Friday, March 7, 2014

Stepping


Hooray! Every stair now officially has a first coat of paint, and the ombre effect looks pretty cool so far. Now for another coat on each, then the ickygritty coat, stenciling, and sealing. I can see the end of the tunnel. Sadly what awaits me there is sanding the other half of the living room.


I still haven't decided what colour to paint the bannister and the board going down the side of the wall. I hate the ugly yellow walls, but I can't repaint them right now without a taller ladder, so I'm kinda stuck there. Also toying with the idea of doing strips down the sides to match the trim in the downstairs hallway.


Thursday, March 6, 2014

13 Shades of Grey

Today I started The Great Clean-Up. Normally this is when I would wash and dust the walls and floor to keep loose dust from getting in the paint. Since I know I am going to be sanding in the living room again in short order, I decided to forgo the wall cleaning. I did vacuum part of the wall, where the worst of the dust was, but as you can see there is still a lot there. I'm going to be repainting this wall after I do the floor, so I'll be washing it eventually anyway.

 
I decided to do a sort of ombre effect on the stairs, which means each stair will be a different colour ranging from Black Suede at the bottom to Fresh Day (which doesn't look as much like a feminine hygiene product as you'd expect) at the top. This sounded like a really good idea until I realized that it meant maths.
 
 
I wasn't really sure how to figure out the mix for the paint. I got some paint mixing containers at Lowes, and after some advice from Science Doctor Dad, I decided to just break it down by ratio, using a unit size of 2 tablespoons, which made 2 units a quarter cup. Thanks to the local Goodwill, the measuring stuff was easy to come by. I set up a little station with all my cups and paints and wound up with 11 happy little buckets (and matching stir sticks!)
 
 
I started at the two ends, since the paint for these is coming right out of the can. It's a bit complicated, because I definitely need to add the gritty stuff here for traction on the stairs, but you're supposed to add it only to the top coat. I'm going to do two coats of the base colors, then add a teaspoon of grit to each cup and hopefully that will work out and no one will slide down the stairs. Here are the top and bottom stair:


All my pretty paint buckets are lined up in a row, ready to grey the stairs.
 
 
I'm slowly adding the grey, step by step. I have to do it in a way that allows me to walk over the steps that are drying, so its kinda higgelty-piggelty. The Supervisor is currently vacationing in the computer room, where he will no doubt tear up whatever he can find to show his displeasure.


So far there are only two consecutive steps to show the colour change, both at the very top. It looks like my mixing plan worked, hopefully it holds out. So far I like the way it is shaping up, I'll have a first coat on all of them by tomorrow, Supervisor and studies permitting.


Just one more thing

I think I might be the Columbo of Bondo. Every time I think I'm done and ready to clean and paint, I find another hole or divot or tiny-tiny scratch and decide it Must Be Filled before I can continue. I think as of today's filling/sanding that I am finally done, but I have said that at least four other times in the last week and been wrong.

The seams on the downstairs hallway are starting to crack a bit and show through the paint, so I decided to go back over the ones on this floor. Covering the whole seam seemed to have worked in the clown room, which isn't cracking at all, so hopefully it'll help here.

 
Another lesson I learned: big contractor packs of 120 grit sand paper SEEM cheap, but they're crap! I bought one thinking I'd save money since I need so much of it still, but the quality is so bad that I think in the end I probably didn't save myself any money at all. My tiny cat-food garbage can is full of clogged up, ripped up pieces of sand paper, and I went through probably 8-9 times what I would have gone through of the "more expensive" stuff. Pharaoh tells me I would know this if I watched more of the People's Court because the judge always talks about mangos and rice and the cheap coming out expensive.  Then he licked his own rump.

 
This is how it looks right now, now for cleaning, and then the "Fun" part. Yay painting! I keep reminding myself I only have to sand the rest of this room and one tiny hallway and then the house is mostly done. It still seems like it'll take forever. My heart cries a little bit thinking of how much more dust Stanley will need to eat. Soldier on, Stanley... Soldier on.